Guide: How to understand exposure and take better photos
The key to taking better photos is understanding the basics of exposure and understanding how it impacts your photography. Here is what aperture, shutter speed, and ISO do to your pictures.
In brief, exposure is the amount of light that reaches your camera sensor and determines how bright or dark your pictures will appear. The exposure itself is determined by just three camera settings “exposure triangle”: Aperture, ISO, and Shutter speed.
Mastering how to use these three settings is an essential part of developing an intuition for photography.
Page Contents
Exposure masterclass
That’s why we created this small masterclass in exposure, but please keep in mind that our exposure-guide is a bit oversimplified to make it easy for beginners to understand.
Shutter speed (1/?)
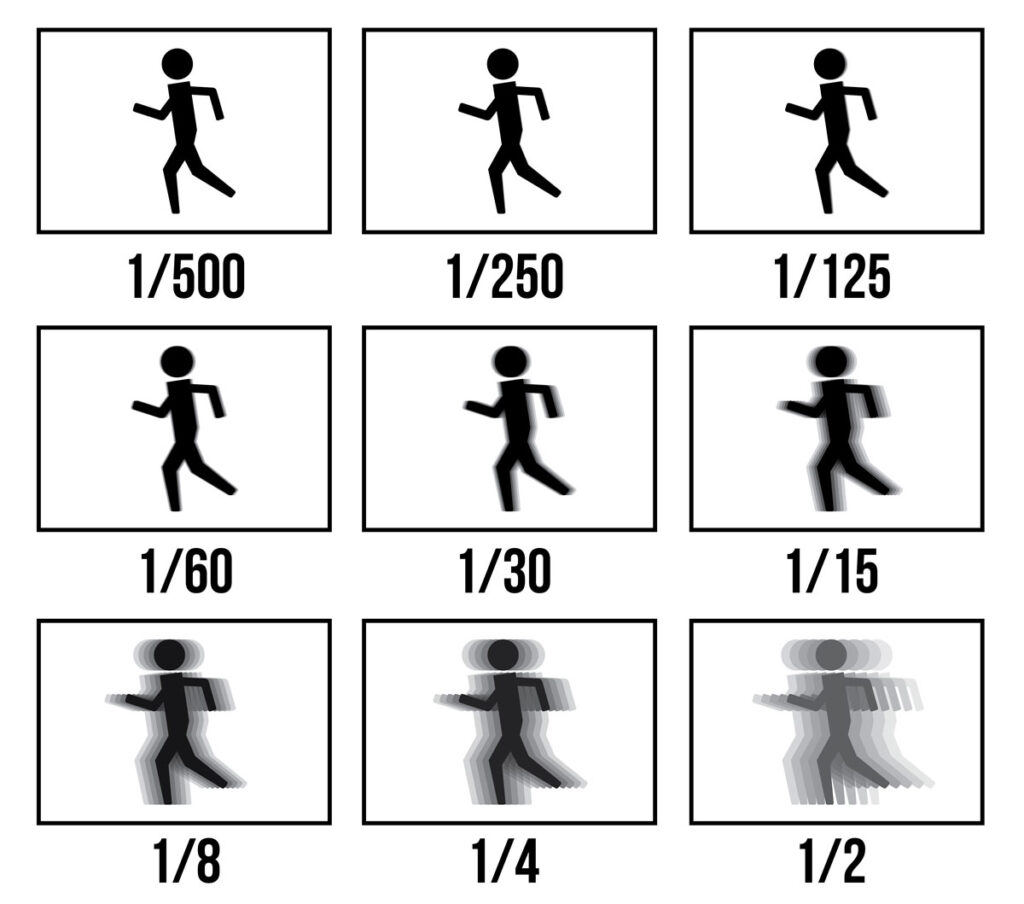
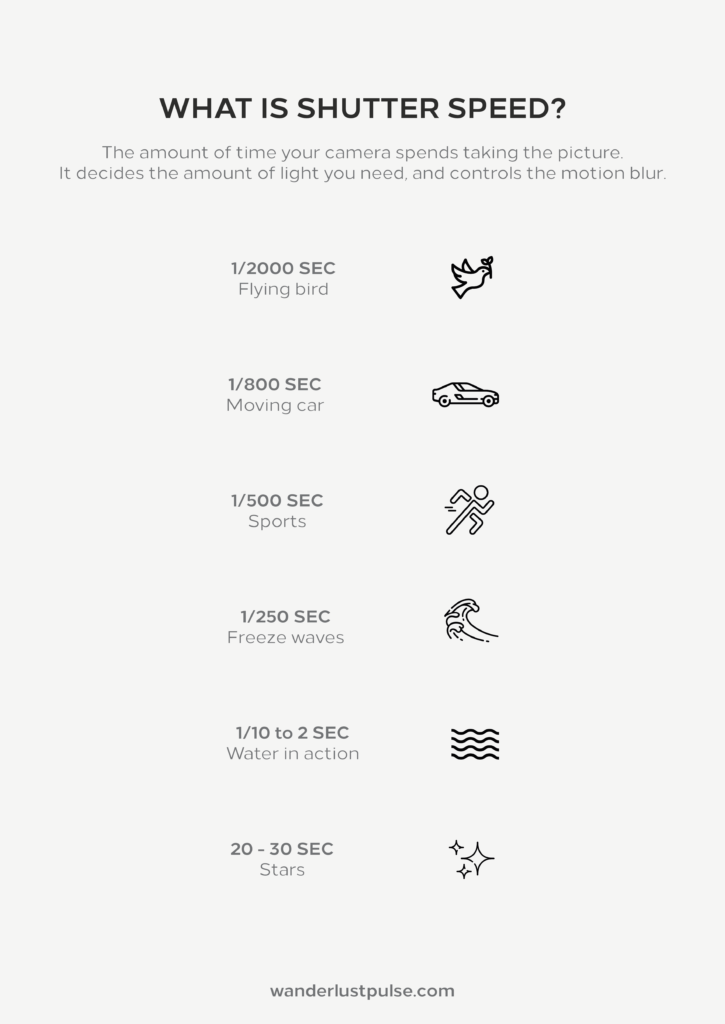
The shutter speed is in essence the easiest setting on your camera: it’s the amount of time the camera spends taking a picture (1/? of a second). The shutter speed is important because of two reasons: it controls the amount of light & motion blur.
| Shutter Speed Scale | ||
|---|---|---|
| 2” Shutter Speed | ←→ | 1/8000 Shutter Speed |
| Slow | ←→ | Fast |
| Blurry motion | ←→ | Freezes Motion |
| Longer shutter speed | ←→ | Short shutter speed |
| More light strikes image sensor | ←→ | Less light strikes image sensor |
| More image noise / grain | ←→ | Less image noise / grain |
| Example: The shutter is so slow, it hasn’t gotten the time to capture the moving subject making it blurry. | Example: Our shutter settings are so fast, it has the time to freeze the motion of an exploding balloon. |
As you might expect: the more time your camera spends taking the picture, the more amount of light it lets in. However – not surprisingly – if anything moves during this time, it will cause a motion blur.
Aperture (f)
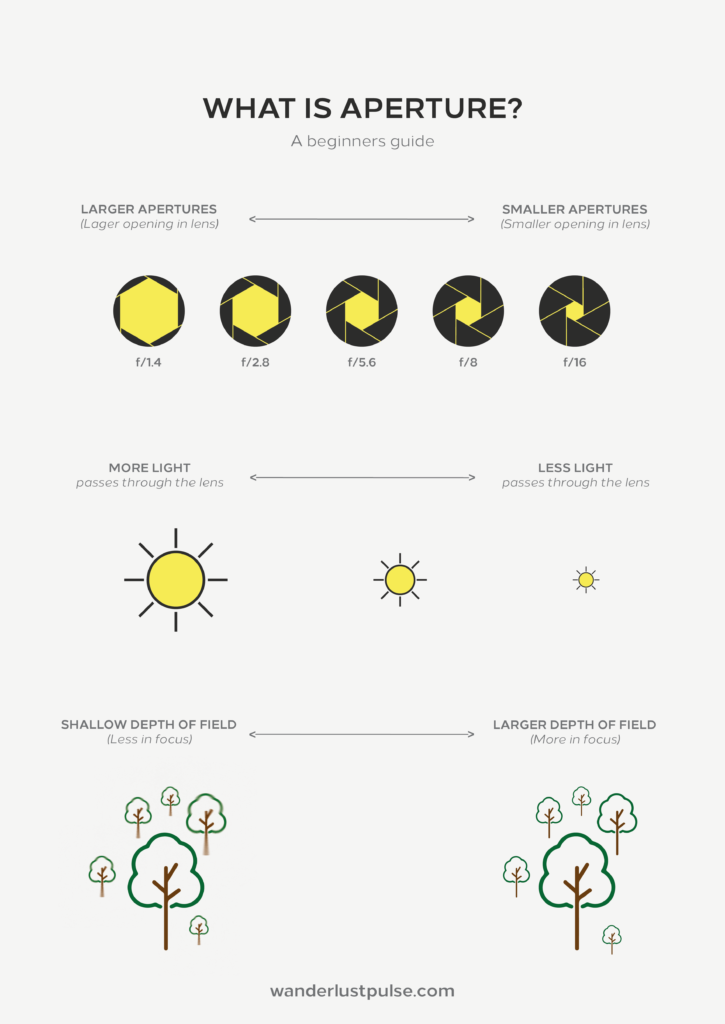
The aperture of a camera lens is very similar to the pupil of an eye: you can open it to let in more light, or you can close it to lower the amount of light that passes through.
| Aperture | ||
|---|---|---|
| By closing the aperture (bigger f/number), less light will pass through the lens. → | ←→ | By opening the aperture (smaller f/number), more light will pass through the lens ← |
Be careful though! The aperture will be written as a fraction: the bigger number in the fracture ( f/number ), the more the aperture is closed and the less light it will allow passing through. Meaning that f/8 is actually a small aperture, while f/1.4 is in fact a big aperture.
The aperture has the most effect on the depth of field in your photo; as your aperture gets smaller and smaller, your exposure will grow darker and darker, and your depth of field will increase.
ISO
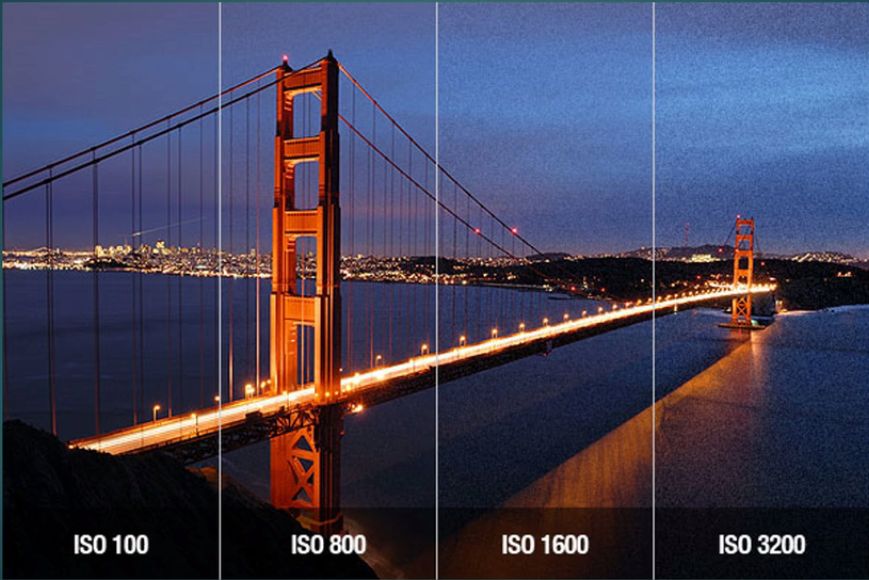
While the ISO settings of a camera don’t impact the amount of light that reaches your camera sensor, it still brightens the photos. The ISO setting brightens your photo in-camera after the sensor has already been exposed to the light.
Meaning the ISO actually brightens the image, but it produces a digital noise/grain which affects the quality of the image.
You’re mainly changing the ISO setting when your aperture is already the widest and you can’t change your shutter speed because it would add in motion blur. (For example Night-time racing, music concerts,..)
| ISO Scale | ||
|---|---|---|
| ISO 50 | ←→ | ISO 6400 |
| Less sensitivity to light | ←→ | More sensitive to light |
| Will capture less light | ←→ | Will capture more light |
| More light needed for good exposure | ←→ | Less light needed for good light |
| Less image noise/grain | ←→ | More image noise / grain |
Example: The image has no noise because we could change the aperture and shutter speed, so it uses a low ISO | ←→ | Example: This image was shot in the dark, so we couldn’t adjust the shutter speed or aperture, which made us use a high ISO and created a lot of noise |
Balancing between aperture, shutter speed & ISO
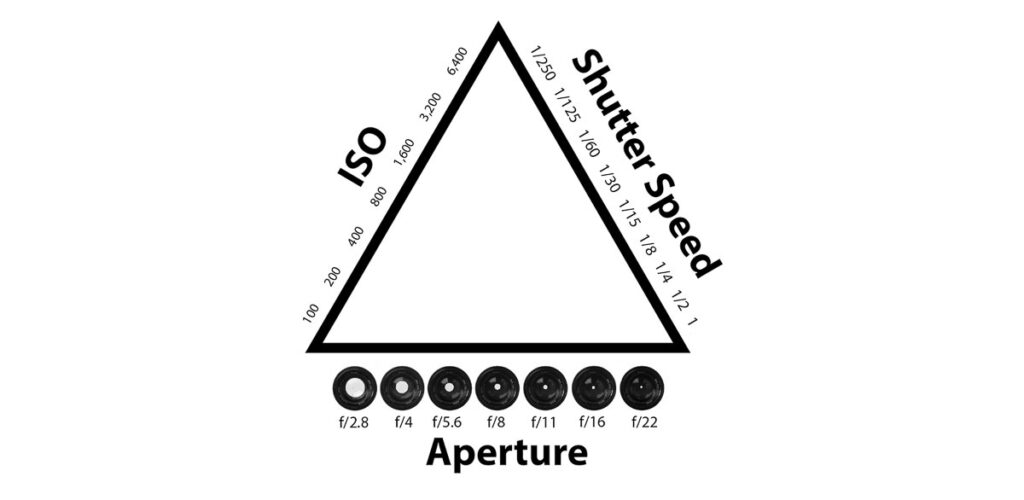
Both the aperture, shutter speed, and ISO are working together to produce a photo that is perfectly exposed; if one of these variables changes at least one of the other settings have to change as well to maintain the correct exposure.
Most beginners use an “exposure triangle”, to train themselves to find the perfect Balancing between aperture, shutter speed, and ISO.
What is RAW in photography?
Normally when you capture a picture with a digital camera, the default setting for it is to save the images in a format known as JPG. This JPG file is a compressed file format, meaning that various optimizations are applied to the image file, which makes the file size smaller.
However: the greater the compression, the greater the loss in quality. Upside: you’ll have a smaller file size and you’ll need less storage space to save it.
A RAW-file, on the other hand, is an uncompressed version of the image file. Essentially the camera takes the image data from its sensor and saves the picture in an unedited and uncompressed format on the memory card. The downside to saving your pictures in a RAW format? It takes more storage space to save it.
This means that shooting in RAW gives you a couple of advantages: You’ll keep all the image data, meaning you can push your image further in post-production when you’re working with brightness, white balances, noise reduction,…
Why we underexpose our pictures in RAW
It might sound counter-intuitive, but with the modern camera sensors it doesn’t make any sense to get your shot “right in the camera”. It’s actually very advantageous and sensible to shoot your landscapes underexposed all the time.
The first reason why we’re underexposing our photos is because this way you can use a faster shutter speed. Most late-night photographers will already know that if you’re in a tough environment that underexposing will win you some shutter speed time and make your pictures sharper. It could be the difference by the perfect sharp shot, or a picture completely messed up with motion blur.
Another reason why we’re underexposing our photos is that it keeps more details of our shadows in our picture and protects our highlights.
The only drawback of underexposing our pictures is that we need to adjust the exposure in our post-production process, but with the modern editing software (Lightroom or Photoshop), this isn’t a challenge as all.

